How to make it even better…
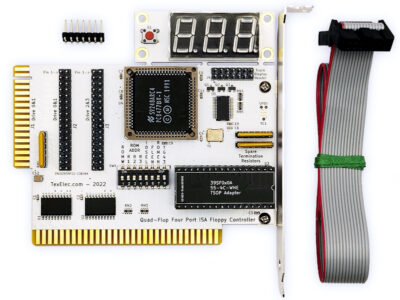
If you landed here, hopefully you already know a bit about what the Quad-Flop ISA card is, if not, take a look at the TexElec site.
This is a great addition to the world of retro-computing. Most old motherboards allow at most 2 floppy drives to be added to the system. The constraints are usually the ports on the motherboard and BIOS options. By using this card you get a whopping 4 and if using 2 together, 8 total drives supported. Imagine having a disk imaging machine and 8 floppy drives with the ability for any combination of drive size from 160K single-sided drives all the way up to 2.88MB ED disks.
In my case, I simply wanted 2 physical drives and 1 Gotek drive for a total of 3. I have a 1.2MB 5.25″ TEAC FD-55GFR Floppy Drive, a 1.44MB 3.5″ Mitsumi D359M3D Floppy Drive, and a new Artery 435 based Gotek Floppy Drive Emulator. My goal was to have all drives active and usable from MS-DOS and Windows 98 Second Edition.
Getting the card to work out-of-box in MS-DOS was fine, the chaos ensued when it came time to install Windows 98SE.
The purpose of this post is to show you what I did to overcome a limitation of what I believe is Windows itself and to solve an issue with the quad-flop at the same time.
What are you rambling about?
The issue I found is that Windows 95/98 only supports AT MOST 2 Floppy Drives (lookup kb-268084). Period. If you have more enabled, Windows 98 will NOT BOOT after setup. You will get this error message which will cause you all types of fun searching for hours, leading to no answers.
While initializing device IOS:
Windows Protection error. You need to restart your computer.
Here’s how the story went. With the quad-flop BIOS enabled my defined floppy drives and boot-order is as follows: A: Gotek, B: Mitsumi 1.44MB, D: Teac 1.2MB.
So, I booted to a Windows 98 SE 1.44MB floppy disk image via the Gotek on A: and proceeded to install all the files via the CD-ROM. At this point everything went swimmingly, until I had to reboot after the setup was complete. On first reboot I got the error above and there’s no recovery…or was there?
Not knowing at the time that it was definitely the quad-flop card combined with Windows limitations, I spent a good amount of time researching and troubleshooting. The one thing I did land on was that disabling the quad-flop bios (i.e. DIP switch 7 OFF) DID allow Windows 98SE to boot normally and operate normally. Unfortunately I lost access to the 3rd drive on the quad-flop, which in my case was configured as the Gotek. But Windows happily saw the 1.2MB and 1.44MB drives – which was my minimum requirement anyway so I was happy with a disabled BIOS on the card…. Unfortunately this now led to issues with DOS 6.22 as I lost access to the Gotek as well, which rendered the entire card pointless if I’m still stuck with 2 drives.
My solution, and probably also an improvement in the quad-flop card operation, was to install an external switch used to toggle the quad-flop BIOS Enabled or Disabled. So I can have it enabled in DOS to have access to all my drives and disabled in Windows 98 so it will boot.
Here’s the steps I took to reach my goal:
- Remove the DIP switch bank from the quad-flop card
- Solder on some 90-degree male pin headers in its place to allow for use of physical shunts
- Build a cable assembly connected to a toggle switch
- Mount the switch on the front of the case
- enjoy

This is the DIP Switch Bank that needs to be removed. Desoldering using flux and a copper wire braid worked well.

This is 2 rows of 90-degree male pin headers soldered to the surface pads of the previous DIP Switch Bank

This is a custom cable made with a 2-pin female DuPont connector on the pin-header side and a mini round SPST toggle switch on the other.

Here’s the finished product mounted to the front bezel surrounding the Gotek drive
It would have been nice if TexElec offered a Pin-Header option as well as the surface mounted DIP Switch Bank, but it wasn’t too difficult finding a solution that worked for what I needed. Most of the time you will NOT need to change these settings on the card, but if you needed to quickly disable the BIOS, you’d have to remove the computer case cover and hunt around inside to find the tiny switch and toggle it – this way it’s as easy as a flick of the switch.
Hopefully this will give you some ideas and possibly a solution that won’t take you days to figure out!
Note: I left out a ton of stuff that may be useful for others, if you have any questions, leave a comment and I’ll see if I can help answer them. The point of my posts are to be helpful, short and to the point so that you can get on with your retroFun.

Leave a Reply